Handwritten Digit Classification
We will program and train a machine learning model to recognize handwritten numbers. The code for this lesson can be found here.
But What Is Machine Learnig?
Process of determining the function that gives a plausible result y for a set of inputs, in form of a vector x. In its simplest form, this could be linear regression, where we find the line of best fit through the data.
In more complex forms, however, this can be training a neural network to fit very non-linear data. We will use a type of neural network to recognize our handwritten numbers.

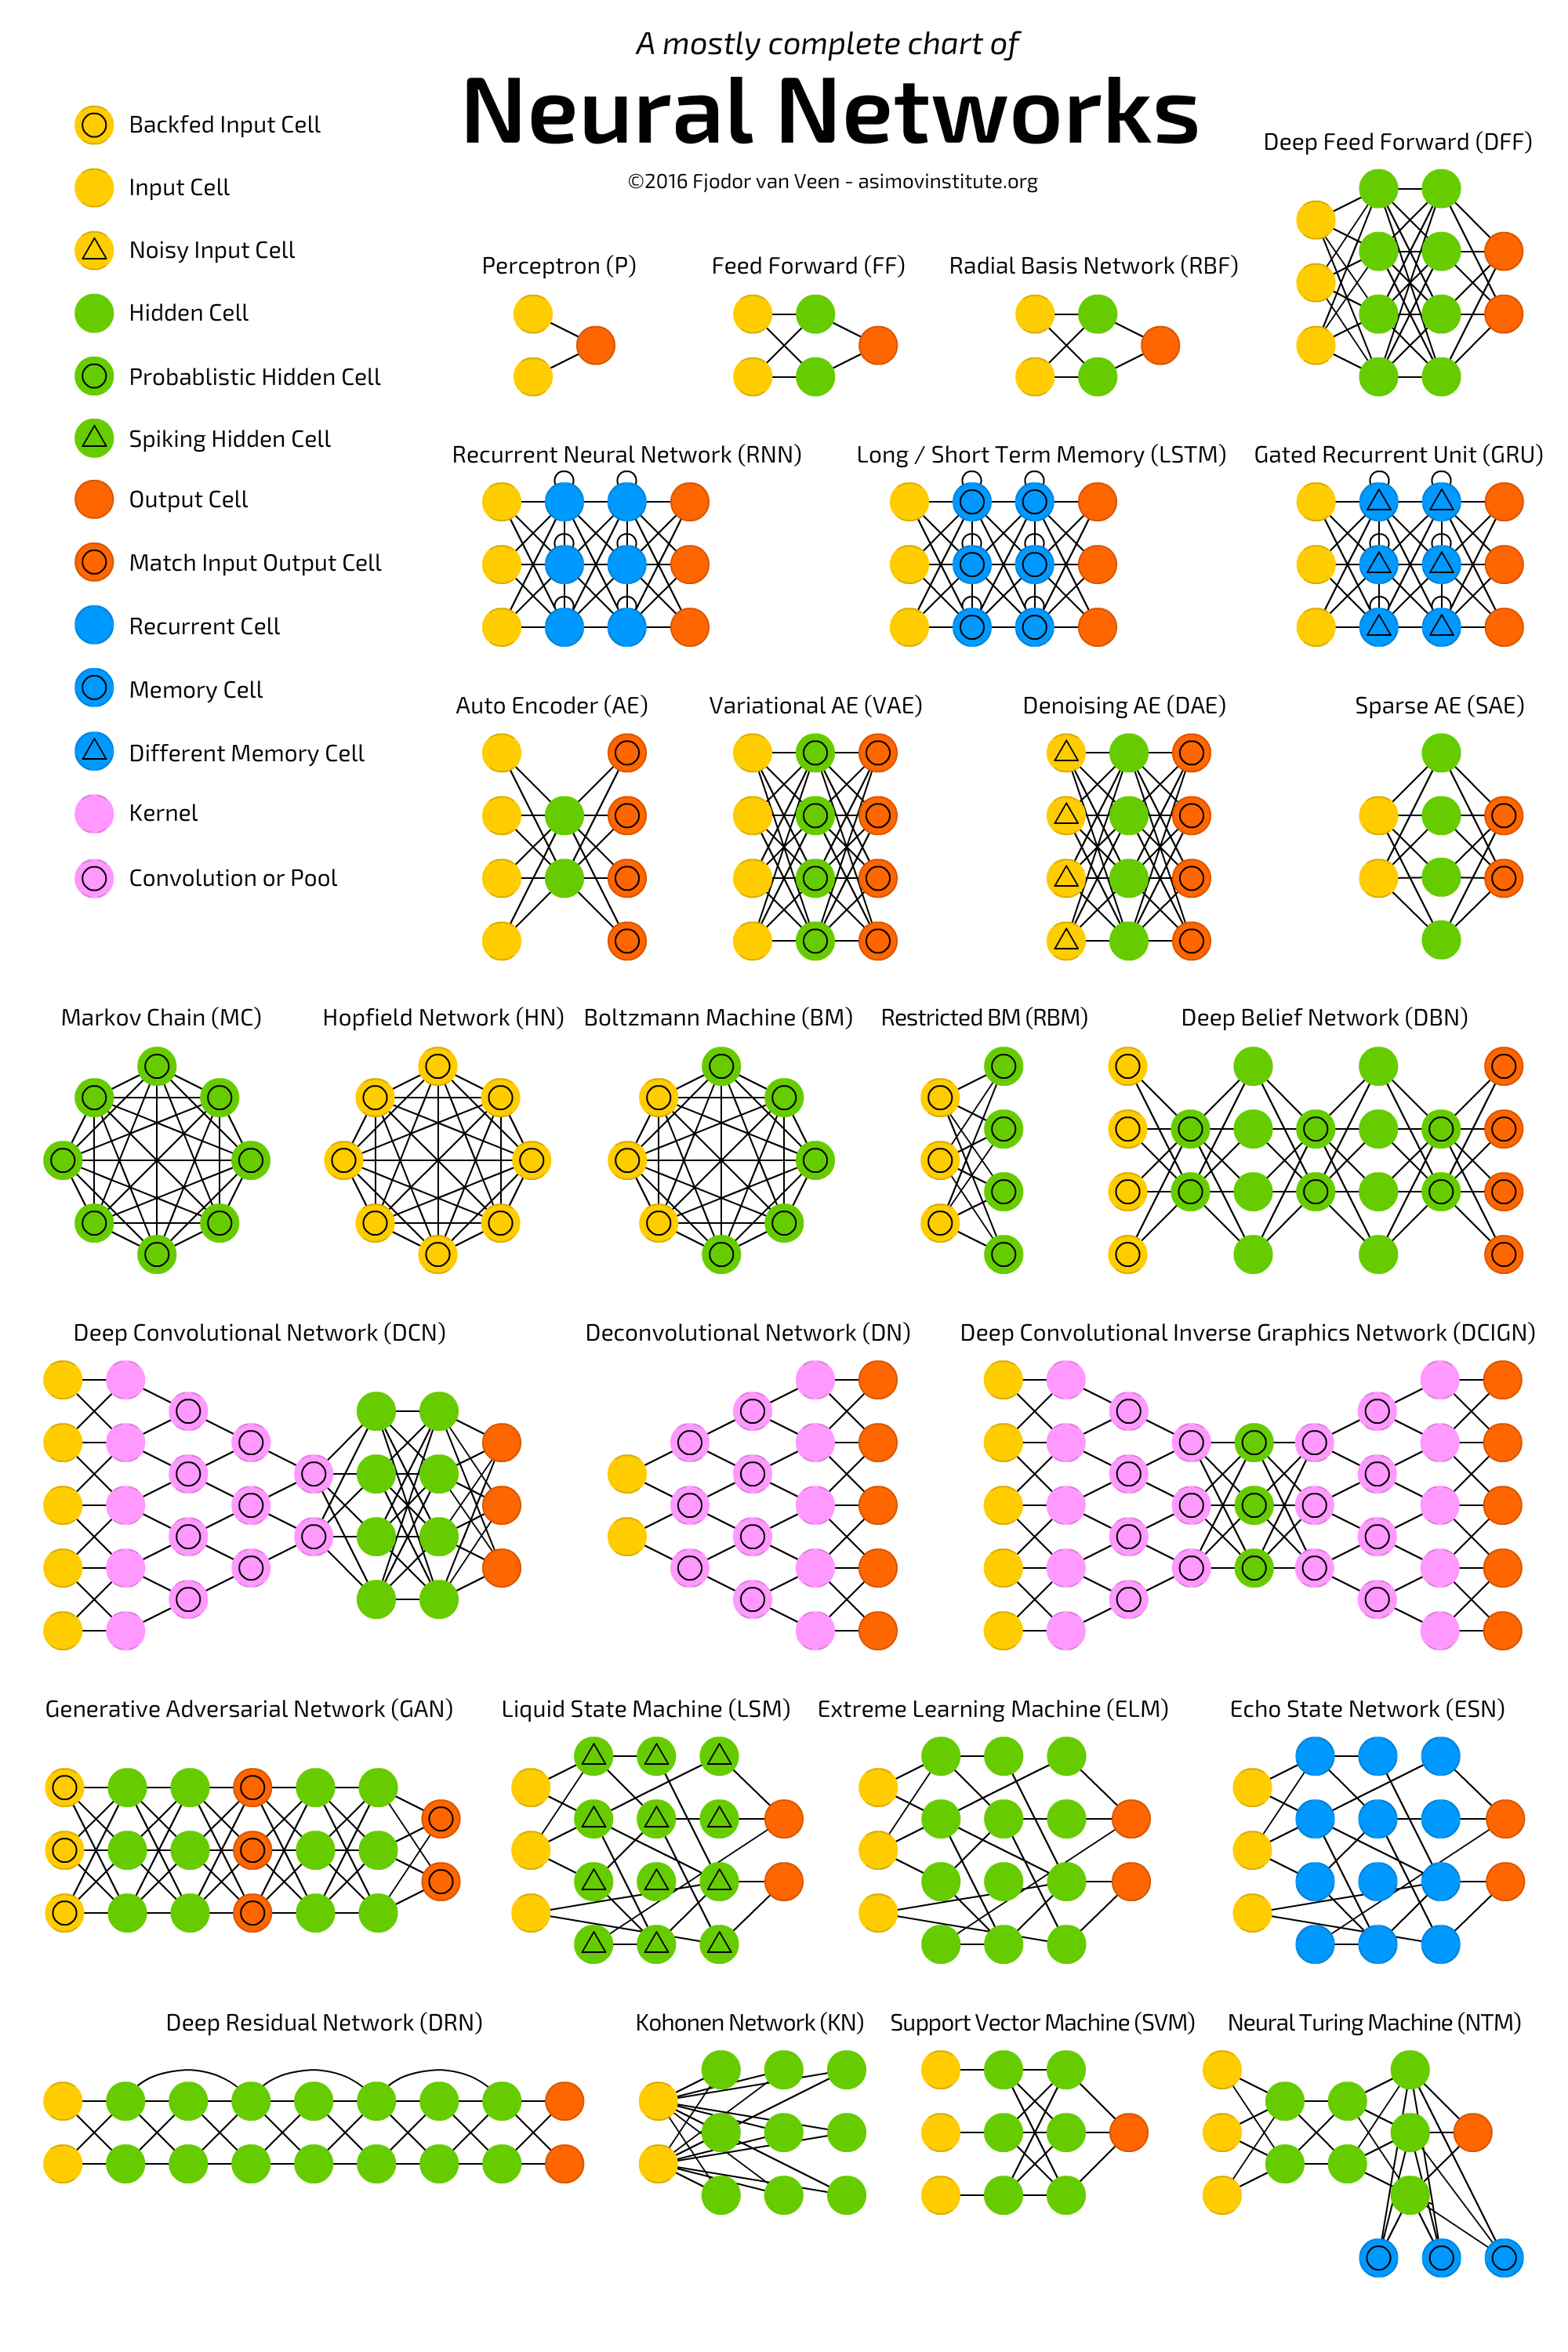
Types of Neural Networks

As you can see, there are many different types, or architectures of neural networks. Some of the most common are Feed Forward, Recurrent, LSTM, and AutoEncoder neural networks. The other most common is the one that we will use, or a Convolutional Neural Network.
Convolutional Neural Network
Since we have image data, we will use a Convolutional Neural Network (CNN). A CNN works by sliding "windows" over the input image and aggregating nearby pixels together.

Importing Packages
For this project, we will be using a machine learning package called Keras. This makes it really easy to construct our neural network. We also import matplotlib to visualize our data, and numpy for some utilities.
import keras
from keras.datasets import mnist  # Get dataset
from keras.models import Sequential
from keras.layers import Dense, Dropout, Flatten  # Need these types of layers
from keras.layers import Conv2D, MaxPooling2D  # Need convolutional layers

import matplotlib.pyplot as plt
import matplotlib.image as mpimg

import numpy as np
Loading Data
Important to load both a training and testing set to make sure the CNN is not "memorizing" the set of images it will train on. This would lead to awful accuracy in the "real world"
# input image dimensions (pixels)
img_rows, img_cols = 28, 28

# the data, split between train and test sets
(x_train, y_train), (x_test, y_test) = mnist.load_data()

# manipulate the data for the CNN
x_train = x_train.reshape(x_train.shape[0], img_rows, img_cols, 1)
x_test = x_test.reshape(x_test.shape[0], img_rows, img_cols, 1)
input_shape = (img_rows, img_cols, 1)
Preprocessing Data
We want to have our CNN work with numbers between 0 and 1. Since pixel values are from 0-255, we divide all numbers by 255 in order to make them between 0 and 1. We then can see how many training and testing samples we have.
x_train = x_train.astype('float32')
x_test = x_test.astype('float32')
x_train /= 255
x_test /= 255
print('x_train shape:', x_train.shape)
print(x_train.shape[0], 'train samples')
print(x_test.shape[0], 'test samples')
Look At Data
In the next few cells, we will look at an example of a digit and see what number it is in the training set.
x_train[0]
pixels = x_train[0].reshape((28, 28))

plt.imshow(pixels, cmap='gray')
print(y_train[0])
Desired Output
We want to convert the desired output from a number n to a vector where the nth element is 1 and the rest are 0.
Example: n = 5 Resulting Vector = {0, 0, 0, 0, 0, 1, 0, 0, 0, 0}
num_classes = 10

y_train = keras.utils.to_categorical(y_train, num_classes)
y_test = keras.utils.to_categorical(y_test, num_classes)
Define Model
Now here is the fun part. Building the model! We will have a 5 layer neural network. Feel free to play around with some of the parameters and see what works better or worse!
model = Sequential()
model.add(Conv2D(32, kernel_size=(3, 3),
                 activation='relu',
                 input_shape=input_shape))
model.add(Conv2D(64, (3, 3), activation='relu'))
model.add(MaxPooling2D(pool_size=(2, 2)))
model.add(Dropout(0.25))  # Prevent overfitting
model.add(Flatten())
model.add(Dense(128, activation='relu'))
model.add(Dropout(0.5))
model.add(Dense(num_classes, activation='softmax'))

model.summary()
Set Parameters
Here, we will set two parameters for the network. The first is batch size, which determines how many training examples we will look at before changing the weights in the model. We will also set the number of epochs, or iterations through the entire training set.
batch_size = 128  # How many training examples will we look at before updating the weights in the matrix
epochs = 12 # How many times we will run through the complete training set
Compile and Train Model
Here, we compile the model and then train it. A couple things to note. We are using the Adam optimizer, as compared to others such as stochastic gradient descent. We are measuring the success of the model through the categorical crossentropy loss metric, which determines how to adjust the weights within the model.
model.compile(loss=keras.losses.categorical_crossentropy,
              optimizer=keras.optimizers.Adam(),
              metrics=['accuracy'])

model.fit(x_train, y_train,
          batch_size=batch_size,
          epochs=epochs,
          verbose=1,
          validation_data=(x_test, y_test))
Test Model
Now here is the big finish, lets see how well the model performs! We will do this by running through our test set and having the model produce a prediction. Thankfully, there is already a function built into the model for this.
score = model.evaluate(x_test, y_test, verbose=0)
print('Test loss:', score[0])
print('Test accuracy:', score[1])
Let's see what happens on an individual image level:
to_predict = np.array([x_test[0]])

output = model.predict(to_predict)

pixels = to_predict[0].reshape((28, 28))

plt.imshow(pixels, cmap='gray')
output
np.argmax(output)